Monday 31 March 2014

A Curious Heart - Words, Words, Words .....


This is my latest challenge entry; I've recycled an old drawer that I originally thought had been a clock housing, I bought it a while back at a bric-a-brac shop for about £2. I've created a little door for it to make it into a little cupboard.


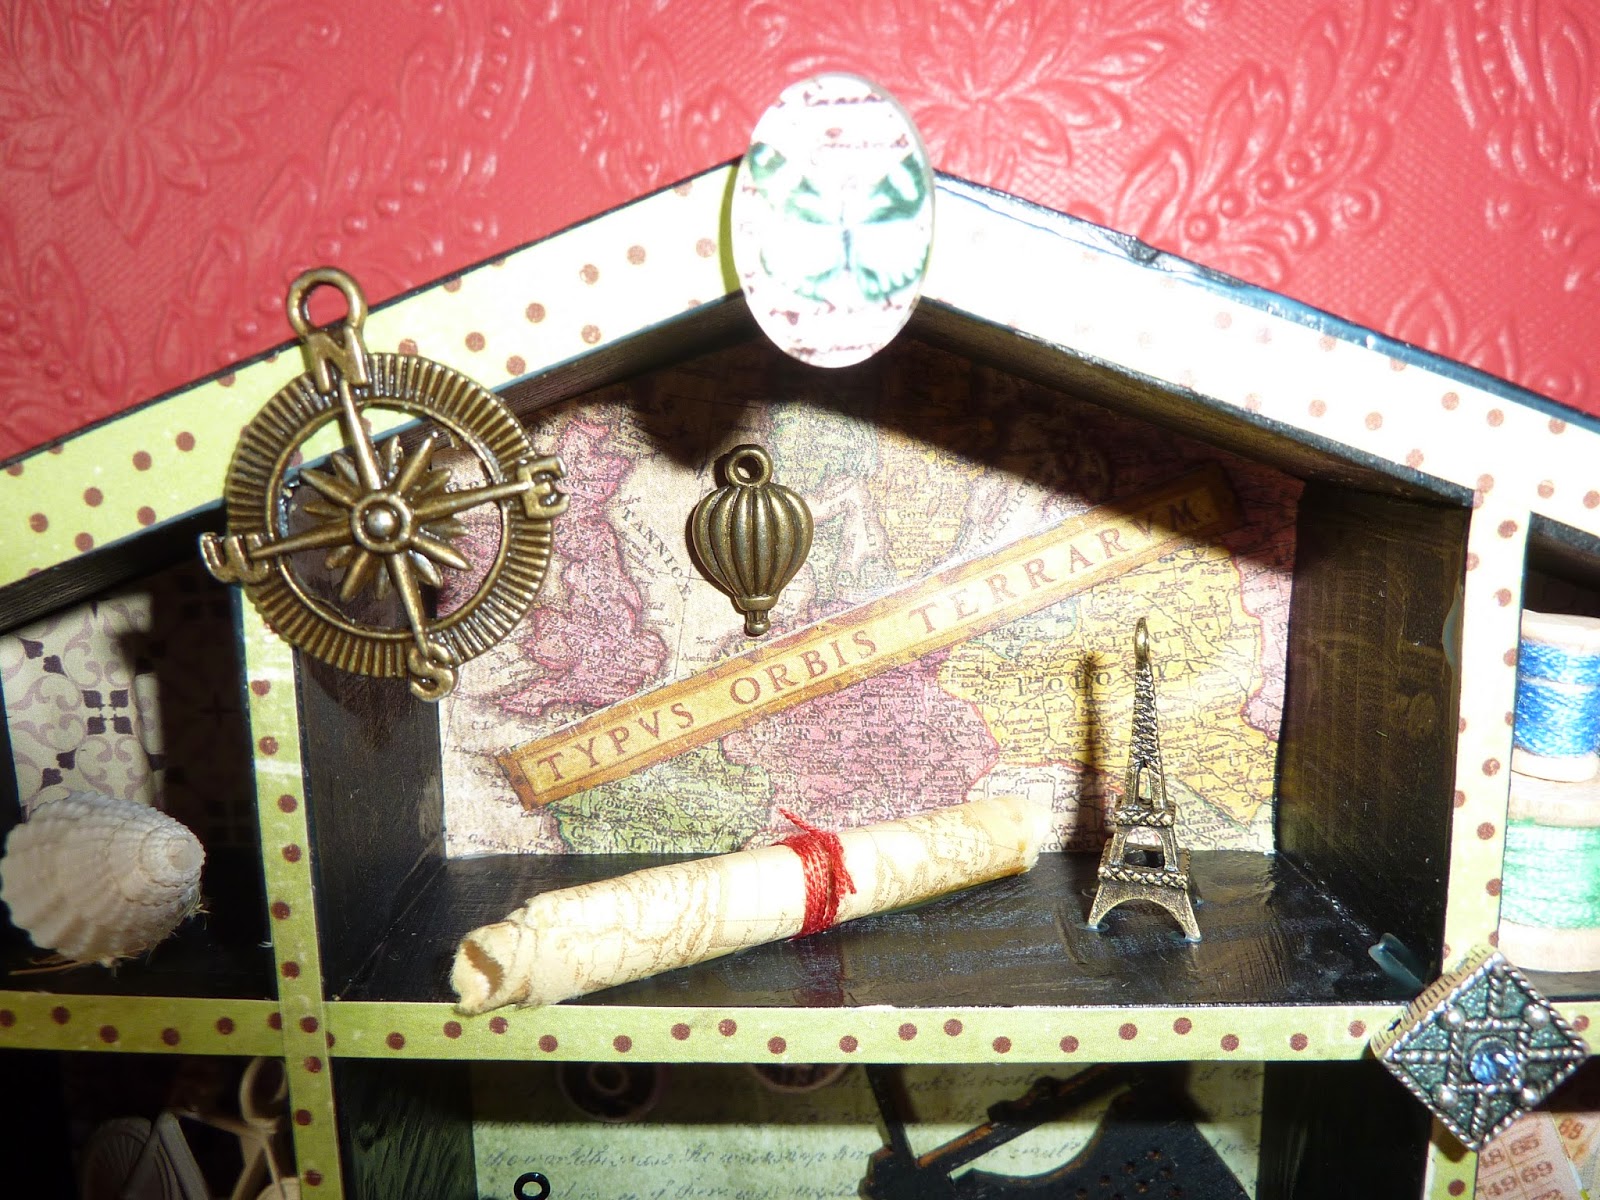
The first thing I did was to line the inside.  I created the background paper by stamping various words (did I tell you I like text stamps?) on a beige coloured sheet of paper using crimson and chocolate coloured ink-pads.  I also stamped some little flourishes. I then blended the edges of the paper with the crimson ink and tattered rose.  The sides were lined with a co-ordinating paper.


I've wanted to try a distress, cracked paint finish for a while so, after a bit of online research,I painted the outside with a metallic copper acrylic paint, when dried I then applied a coat of pva glue and when thi was tacky but not completely dry I applied a coat of black acrylic paint.  As the glue dried the peeled effect revealed itself. I'm more than pleased with it for a first effect!


The door is a strong piece of card which I've covered with two different papers.  The front first, then adding the hardware (hinges,  handle and bookplate) before adding the back piece.  I then added a stamped tag, some wooden cogs and a leather flower embellishment to the inside of the door. I used some large round beads to create the feet.


The heart is a small polystyrene one which I've painted with a mixture of copper, red and black paints before threading a wire through it to hold it in place.


I am entering this into the following challenges:
SanDee & Amelie's Steampunk Challenges - Your Favourite Technique goes Steampunk (I've decided that the peeled paint technique I used is a new favourite!); here (www.sandee-and-amelie.blogspot.co.uk/2014/04/your-favourite-technique-goes-steampunk.html?m=1)
Rhedd's Creative Spirit monthly challenge - altered art: here (http://rheddscreativespirit.blogspot.co.uk/2014/04/april-challenge.html)
And


Wednesday 26 March 2014

Things with Wings - an ATC swap

Well I was planning on my next share being an update on the crazy quilt round robin's I'm taking part in but currently one of my blocks got lost en-route to the US and I've now sent a replacement (hopefully will be received next few days) and I'm a little behind with my stitching on the second due to my hands not wanting to play (I have both Reynaud's & Pompholyx - and seem to be having a double flare up at the moment).

So instead I am sharing some ATCs I've made - my first ever (!) - for a UK based swap group.  ATC stands for Artist Trading Cards, they are 2.5 x 3.5 inches in size. Many artists and crafters make them to test out different techniques and to swap with fellow crafters.  I first came across them when looking for altered art inspiration on Pinterest and have been hooked ever since.  The thing was though until I found the swap group, who was I going to swap with?


The good bit about being in a group is that usually the theme is set - I thought this would help get me focussed.  This month, my first though was titled 'Pick your Favourite' from all their previous swaps.  Being a newbie this made it virtually Anything Goes, so I had to rack my brains a little.

I chose Things with Wings as I love butterflies and dragonflies and figured I had plenty of stamps and embellishments that would tie in.  So I got stuck in.

My first step was to create some backgrounds.  I used a combination of misting sprays on pieces of artist water colour paper cut to size.  The colours I used were Mulberry, Tango Crush, Teal and Fireburst Blue.


Once dried I then stamped over with a script stamp in a deep purple colour.


Looking through the various images and stamps I have I chose a lady with wings and a butterfly for one card, images of angels for another two and used these to collage with.  On the final two I stamped some postal themed stamps adding a butterfly to one and a dragonfly to the other.  I also added an old postage stamp to each.


I left them to one side overnight to look at the next day and see what I thought was missing.  I decided to add some more stamping to the cards with the angel images, and some ribbon to two of the others.  I edged all the ATCs using the matching ink-pads - Tim Holtz distress in Faded Jeans, and Adirondack Cranberry by the way -and then sealed them with a couple of coats of Artsy Collage Sealer allowing each to dry in between.  On the reverse I created a label (using Serif Craft Artist) showing the title of the cards, the number I'd created, the date and my name with blog address.


I've enjoyed making these and it has meant that I could still be creative even though I've not been too well. They've been posted off today & I'm hoping the eventual recipients like them.  I'm really looking forward to seeing what I receive in return!  I promise to share photos!!

I'm going to enter these into the monthly challenge over at Inspiration Journal ( http://blog.inspirationemporium.com/ ) this month the theme is A Splash of Colour.

Thanks for reading
Stefanie x


Sunday 16 March 2014

Challenge Entry for A Vintage Journey and Craft All Day

There's been a great new challenge blog launch for devotees of everything shabby chic and vintage, especially if influenced by the great Tim Holtz ~ A Vintage Journey (here at http://www.vintagejourney.com/) Their first challenge is simply 'Anything Tim'

I talked a lot at the beginning of the year about wanting to enter a few challenges and this one has inspired me to take part!  I am also entering my piece into the monthly challenge at Craft All Day, where I got a few of my supplies from (http://craftallday.blogspot.com/2014/03/challenge-4-anything-goes.html ) their theme this month is Anything Goes.

One thing I've wanted to create for a long time is a shadow box - I could spend hours (hmm and probably have!) scrolling through all the delicious ones on show on Pinterest.  They just really catch my imagination so I bought a few blanks a while ago but have been waiting for the mojo to hit.  I figured the time is finally right!


I decided to use this little MDF house shaped shadow box, I really like the fact that it has different shaped sections so I could really play around with them.


So my first task was to paint it all black. I used a simple acrylic paint for this, making sure to really get into all the inside corners. I chose black as I wanted to make this one quite antiquey (is that a word!?) a bit like an old library or reading room feel to it, but there are some lovely ones which have been painted white or pale pastel colours which give a lovely shabby chic look. I will try one like this in the future sometime I'm sure.

Once the paint had dried, I spent some time picking out which papers I wanted to use at the back of each section to help give some definition. Again I went darkish papers to carry on the theme.  You might (if you look closely!) notice a few scripty papers and one with maps - two of my favourite things - words and maps!  This is also true with my choice of fabrics - my friends just have to point out either and they know I'll take the bait!


I decided that the longer section at the bottom would work best with a drawer - this though meant I had to create one.  So I measured the opening, depth, length and height and cut some stiff card to a shape that I could then score and fold to make the drawer.  I then lined it and covered the front with more papers and a little washi tape; I also attached a little handle with a couple of small brads.


The next bit was the really fun bit! Choosing which embellishments to put where, and fastening them in to place.


Here are a few close-ups of the individual sections.  My favourites are the 'Words' one - I would really like to have some vintage typewriter keys but haven't treated myself yet - to make these I found a copywright free downloadable image, printed it off and then cut out the letters I wanted and glued them to some little chipboard circles I had - and the 'Map Room' - I spent a long time working out what was missing after I'd placed the Eiffel Tower and the balloon and then it suddenly came to me to make a little map scroll to place in there too.


I'm really pleased with the result, and will definitely be making another.  I hope you like it too.

Thanks for reading!

Stefanie xx


Friday 7 March 2014

An Alice themed swap!

Hi - so as promised here's my second post this week.  Just before we went away I took part in another one of Zuzu's Petals Altered Art 'n' Stuff swaps - this time an Alice themed one - it could be from either Alice in Wonderland or Alice through the Looking Glass, and the item could be anything.  She's so good at arranging these swaps for us - now this one's finished she's arranging an altered bottle one for us & yes I've got my name down already!!  (This is a link to her Facebook page https://www.facebook.com/pages/Zuzus-Petals-Altered-Art-n-Stuff/250932564937553 and her blog too http://zuzuspetalsstuff.blogspot.co.uk/2014_02_01_archive.html )


 I decided on decorating a canvas box frame - the photos haven't come out as good as I would like but I thought I'd totally lost them when my 'phone broke last week - luckily I could still hook it up to the laptop and download them.  I'm now waiting to see if they can fix it or not.  Well that's another good reason to use my camera in future!

I started by sewing together some squares of Alice material that I had got in a mixed job lot a while ago and then folding it over the front of the frame (which would now be the back) and gluing it in place at the back (now the front!)


 I ordered some Alice themed chipboard pieces, which I painted with Decoart Metallics in Black Pearl, this actually looked nearly silver once it dried to a really nice metallic sheen.


I positioned these around the outside of the frame, together with a small Queen of Hearts playing card (see those Christmas cracker prizes come in useful sometimes!).  In the middle of the frame I stuck another piece of fabric (in colour this time) with Alice's head and shoulders showing beneath a silver frame.  It reminded me of the looking glass.  I drew a spiral circling from this and attached two metal embellishments, an old-fashioned pocket watch and a key.


To finish it off, I took a small bottle (from a Creative Expressions set) and filled it with a mixture of PVA glue and walnut stain, then attached a little ticket shaped label with 'Drink Me' on it with a piece of hessian string.

I also took two phrases from Alice in Wonderland - 'Curiouser & Curiouser' and 'What is the Hatter with me?' and glued them onto two of the chipboard figures.


In return I received a lovely little altered cabinet in a Cheshire Cat theme.  It was from the talented Hope at Wayside Cottage (https://www.facebook.com/PixiesHandmadeHome and her blog at https://www.facebook.com/PixiesHandmadeHome )  Here's a photo of the before (thanks Hope) and a few of the finished piece.  I've got it on the hearth on my fireplace now.


Thanks for reading.  Hope you all have a good week  :o)