Sunday, 2 March 2014

Back from New Orleans & a Valentine's gift

Well we're back!  We had a wonderful time in New Orleans (when we finally got there!) we had a two day diversion first due to the weird snow-storm that hit the East of the US at just the wrong time!  It was great seeing my uncle again - it's been about 7 years since I saw him last - and 25 since I last saw his wife (!) we also got to spend time with two of his adult daughters - only one of which I'd met before.


Although we left before Mardi Gras proper, they run smaller parades in the run up so we got to see quite a few of these and the atmosphere was brilliant :o)  We did get (slightly) carried away with the beads and things they throw from the floats as you can maybe tell..........

We spent lots of time in the French Quarter which is beautiful - on a side note there is a pharmacy museum there with LOADS of old bottles - I just love bottles - had a trip on the only remaining totally steam operated paddle steamer and to keep the kids happy took in a basketball game.

Just before we left on our trip (and I do mean just - barely time for the glue to dry!) I made a Valentine plaque for Phil, then hid it in the case to give him while we were away.  We were stuck in a little motel on the day itself rather than in New Orleans but luckily we did have our cases so we could still exchange gifts.


This was actually a reworking of a plaque I'd worked on previously and really didn't like.  It was a rather odd shade of green with some texture paste stencilled on to it and just didn't look right.  So I found some silver tissue paper which I stuck down with the old faithful PVA glue, allowing the raised texture paste show through from underneath and I added in some creases too, this gave a really nice textural look.  I then swooshed (love that word!) some Tim Holtz distress ink-pads (antique linen, tattered rose & faded jeans) over it and over a piece of centura pearl card that had been embossed with a handwriting script.  I then stuck the card over the tissue paper on a slight diagonal.


Next step was then to stamp out some images, I used Steampunk Travels by Whimsy Stamps and an old watch stamp I have but can't remember the manufacturer of, stamping them onto matt cream card in Soft Suede by Stamping Up.  I also stamped a small heart stamp on the same piece of card using the Adirondack Cranberry - but I forgot to include a photo of that (!)  The quotes are: 'You are my Past and Future' and 'I would travel through time for you'.


 I then tore around each of the images to give a rough edge to the card and used the Antique Linen over the surface to give a finish a little like a tea stain and edged them with the Faded Jeans to tie it into the colour on the embossed card and worked out where to place them on the plaque - gluing them again with the PVA.  And there you have it!


I've another completed project to share with you later in the week from a recent Alice in Wonderland swap, and having discovered a wonderful quilt shop just four doors away from my uncle's house - where I may have spent a little birthday money (I'm now 44!) I'm planning a new little hanging too :o)

Take care


Tuesday, 11 February 2014

Sewing themed Crazy Quilted Wall Hanging

Hi - today I thought I'd share this sewing themed crazy quilted wall hanging, made for one of my best friends.  I am very lucky that I have two very dear friends that mean the world to me: Sarah who I met at school when I was 13, and Wendy who I met when I was 17 and in my first job.  We all turned 40 in the same year and have been through so much together.  (Another Gratitude to add to my jar!)


This was made for Wendy's birthday this year, and she has seen it now so I can share it here.

I chose a sewing theme as Wendy is a quilt-aholic! We started attending the quilt club at the same time but she has made so very many beautiful quilts. We have actually nicknamed her Whippet Wendy because she is so quick and seems to have completed a new project between every class! I also had to include an owl - mostly because if we ever see fabric with owls on Wendy nearly always has to have it - I'm the same with maps and text on fabrics!


I am very careful to only use patterns that have either been gifted by the designer on their blogs, or that I have purchased myself.  Something I am keen to stress is that it is not acceptable to find the images and simply copy them without the designer's permission.  I am aware of several designers and artists who are genuinely distressed when they find that their work has been copied without permission after they have put so much work into them. (rant over!)

Some of the places I find the patterns I use are Urban Threads (www.urbanthreads.com) who have both machine and hand-stitching embroidery patterns; the Quilter's Clock was from www.mastelitas.blogspot.com; the pincushion was from www.cathroncountrydesigns.typepad.com and I linked it with the sewing basket which I found on Red Brolly (http://www.red-brolly.com/red-brolly/free-red-brolly-patterns.html) as part of The Wish Christmas Quilt; the owl was from http://stitchybritches.blogspot.co.uk/2010/02/owl-love-you.html I usually visit Google or Pinterest to search for free patterns or tutorials first and this usually then leads to a whole evening of very enjoyable blog-hopping and then me feeling a little guilty as I have done nothing at all other than browse the internet! 


So the little stitcheries were the starting point for this hanging, but originally I was going to make it as a more conventional quilt design with each stitchery at the middle of a block.  Once I'd bought the fabrics though and started to think about how they would go together it quickly morphed into a crazy quilted piece.  This meant that I had to trim the stitcheries down into odd shaped pieces and then construct each block using a stitch & flip method (I will do a tutorial on this at some stage - promise!).  Each of the small blocks measured in at 7.5" square and the central piece with the text in the middle was 7.5" x 14.5" - after joining together this gave me a piece that was 14.5" x 21.5 due to the seam allowances.  I then used strips bits of lace and some metal charms to embellish areas of it, I decided not to use beads on this piece as I wanted to keep it more 'homely' as I felt this would suit Wendy best.  I then cut some wadding the same size and a back piece of fabric. 


Normally I would sandwich these together, pin and quilt them and then bind it; this time however as I wanted to add a piece of broderie anglaise trim to one side I decided not to add a binding and instead laid the front and back right sides together and then pinned them with the wadding behind the front piece and the trim down one side.  I sewed around the outer edge, leaving a small gap in the centre of the top and then turned it right side out through this gap, and then closed the gap with a whip stitch.  I smoothed it out flat and re-pinned it before quilting down the seams joining the different blocks together.  As this was for a wall-hanging rather than a functional quilt I think it is enough, but I would have done more if it had been a lap-quilt for example.  I then added a hanging sleeve and a label on the back to finish it off. 

I am away now for just over 2 weeks as I'm visiting my uncle in New Orleans (yay!) and I'm not sure on what internet access I will have.  This means I probably won't be updating the blog until the beginning of March.

Take care everybody & thanks for reading.


Thursday, 6 February 2014

Technique Toolbox with Claudine Hellmuth

Well I'm feeling incredibly lucky :)

A little while back while visiting one of my favourite blogs - that of the talented Tammy Tutterow which you can find here at http://tammytutterow.com/blog/ - I entered a giveaway competition.  And - guess what - I won!!

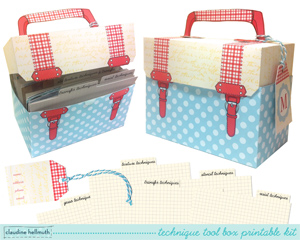
The prize is a place on Technique Toolbox, a 5 week mixed media online class with Claudine Hellmuth!  It's being hosted at Big Picture Classes - www.bigpictureclasses.com - I'm really looking forward to this.  Over the 5 weeks Claudine will share 25 different techniques with us, and as a little bonus she's given us a PDF of a little toolbox that we can print out, assemble and then use to store details of all of them.  I just need to get some card that will fit through my printer and then I can get cracking with that!


There is still time to sign up for the class, which starts on 10th February and runs until 12th March.  If you've not taken an online class before and are uncertain whether that learning style would suit you they also offer some free classes which will give you a little taste of how they work.  Well worth a look :)

I'm also planning to take the Tim Holtz - Chemistry 101 & 102 classes and I think the toolbox may come in useful for storing those techniques too!

Anyway that was just a quick update from me - I've got some sewing to do!!!

Friday, 31 January 2014

Crazy Quilt Journal Project 2014 - January

Firstly, I'd like to say a big thank you to everyone who visited as part of the Grow Your Blog party - it was really good to get so many lovely comments.

Right-ho, so just by the skin of my teeth here is my Crazy Quilt Journal Project for the month of January!  I'd completed the block itself a couple of weeks ago, and started the embellishment but then got a little 'stuck' with where to go next with it.  After a few evenings searching on the internet for inspiration I got back on track (phew!) so I'm just in time.


And here are a few photo's of it as it progressed along and some close ups of some of the details:


I'm actually really pleased with how it has turned out, although it's difficult to know where to stop and sometimes I do feel that less can be more, but hey, crazy quilts are all about embellishments!!

Sorry this is only a short post, I've been playing the proud mother tonight at my daughter's Air Cadet presentation evening, she got 6 certificates and a trophy!!   :)

(Edited 01/02/2014 to add:

After posting this yesterday I thought maybe I should recap on why this block centre has the word Giggles.  It is part of my wanting focus on the positives this year and recording the things that I am grateful for so I decided that my blocks for CQJP 2014 should all be a reflection of these.  The giggles in question were a night spent watching films and enjoying finger foods with my family, we shared a lot of giggles and I found it a particularly good night.  

I chose quite bold and bright fabrics for the block, wanting to keep with the cheerful theme; and am not sure whether I will for the remainder as it was difficult deciding on the embellishments not wanting them to be overshadowed by the fabric.   That said I am pleased with the block and I'm looking forward to what Gratitudes February will give me.


Friday, 24 January 2014

Grow Your Blog 2014

So today is Grow Your Blog 2014 day!  It's a sort of blog-hop organised by Vicki at 2 Bags Full (here - http://vicki-2bagsfull.blogspot.co.uk/2013/10/grow-your-blog-2014-this-is-official.html) whereby people sign up with their blogs that they would like more followers for and then return the favour by visiting other blogs and liking the ones that appeal to you.

Hopefully I will find one or two people that my blog appeals to - I don't really like talking to myself - we shall see!

As you may know I have Fibromyalgia (diagnosed in 2010) and struggle with varying combinations of pain. fatigue and depression.  I had to end my nursing career as a result and went through some very low, tough times; gradually I returned to crafting as a form of therapy and I started this blog in November 2013 as a way to help me focus on the positive achievements in my life as I am a strong believer in focusing on what you want more of.  This will be my 10th post and so far I have I have managed to include a new piece of work (whether it be complete or not) in each.  My aim for the next year is to post at least twice a month, but not to beat myself up if I don't - it's all too easy to fall into that trap and it can start a vicious cycle.

I guess I'm a bit eclectic in my crafting style(s) - I like playing with fabrics and getting messy with inks too.  I've tried my hand at stained glass making, knitting, crochet, jewellery making (last year I gained a City & Guilds Level One qualification in this) I really love all the different sorts of Mixed Media and Altered Art especially Altered Books and intend to include more of these projects as my blog progresses.


These are photos of a few of the things I have created over the last couple of years, I think the only real theme is that there is no theme at all!!

I hope you take time to have a look through my earlier posts and if you like what you see, please consider following me.  Thank you

Thursday, 23 January 2014

Making Progress

Hiya - well I've not got as far as I would have liked to do as I've had a few sick days and had to rest up BUT this is my positive outlet so I'm not about to dwell on that.

What I did want to share is the naked block ready for a crazy quilted round robin I'm about to participate in, titled Under the Sea.  I'm really looking forward to this and to the Novice one I've also signed up to, I shall be piecing that block next week, and also finishing off the one for CQJP2014 - can't fall behind with that especially in the first month!!

So, my Under the Sea block - I really liked the idea of this and I had a few marine themed fabrics from a little lap quilt I made at the very beginning of my quilting journey - it was an Elemental quilt in log cabin, with a section for each of the elements, Earth, Air, Fire and Water and with Spirit a part of all, here's a few pictures of it:


So I took my marine fabrics, one with bubbles, one with seahorses and one with shells on as a starting point and then I waded through my 'small' fabric stash :) to find some more to put with them.  I came across a fat quarter with some multi-coloured fish on, it came in a bundle of fabrics that I bought cheaply and was one I never really thought I'd use but I did add some of it into this block.


Having not done a crazy quilting round robin before I was worried about using too much fabric with specific images on in case it detracts from all the embellishments that are going to be added but I'm hoping I've got the balance about right.  I also included some batik fabrics in bluey-greeny shades and with a pinkish blush which reminded me of the look of coral.  Last but not least was some dark green velour which feels lovely and I feel it adds a lot to the block.


I'm posting it off over the weekend and really looking forward to see how it evolves - slightly nervous about my own contribution to all the blocks coming my way to work on, it will certainly be a learning process (!) but that's exactly what I signed up for!

There'll be another post tomorrow (what!? two posts in the same week!?) as it's time for the Grow Your Blog 2014 blog-hop courtesy of Vicki at 2 Bags Full you can follow the link on the side-bar or take a look here http://vicki-2bagsfull.blogspot.co.uk/2013/10/grow-your-blog-2014-this-is-official.html

Thanks for reading :)

Monday, 13 January 2014

January ~ First Full Week In

So I can't believe it's January 13th already!! Time to check in and see where I'm at with all my crafty endeavours ........

First up ~ Crazy Quilting.  For my Attitude of Gratitude block this month, I'm working on the theme of 'Giggles'.  I've chosen this so it will remind me of a lovely night spent with my daughter and my other half ~ nothing fancy but we watched a film, had bits and bobs of finger food and shared some giggles.  I've decided that the centre of each block will be a little stitchery as I enjoyed all the stitcheries I done on the run-up to Christmas.  The block itself isn't finished yet, but here's a little peek at the planning stage of the stitchery bit ~ you'll have to wait for the rest.


I've also signed up to two Round Robins over at Crazy Quilting International, a novice one and one titled Under the Sea so I'm waiting to get the schedule details of those.

As for the other bits of craftiness they're on hold until I finish organising my stash, which has gotten a little out of hand to be honest!!  So, I've gone through all my stamps and put them in categories, they now have a drawer each.  I may have made a little mistake in letting my daughter make the Dymo labels though ~ she thought it would be a great idea to personalise them for me ~ Faeries became Scaeries and my Wheely Stamps in the bucket photo became Kneely Cramps (quite appropriate for me!) and those are just the ones I can really share!!


I thought I was doing really well and then my Christmas present from Phil came (I know it's a bit late but it came all the way from the US of A!) it was a mystery box from Prima ~ apparently a lot of the craft companies in the States have a warehouse sale at the end of the season to clear out that stock and make way for the new season's stuff coming in.  Prima, and Maya Road is another, do a sort of mystery box, you buy a box but don't know what exactly it will contain until it arrives.  They are really good value and obviously very popular in the US, there are lots of YouTube videos of people opening theirs.  The drawback with getting them from overseas is obviously the postage and the worry about possible import taxes, so I looked into the tax bit quite seriously and realised that the Prima box would be under the taxable threshold and as Phil was at a loss as to what to get me, we bit the bullet!  Well it arrived and I'm really impressed ~ Phil said I looked like a little girl opening my present and going through all the goodies inside!!


There were allsorts! Stamps, stickers, vintage metal embellishments, stencils, rub-on's and of course Prima flowers too.  I think I may just have to buy another next time round .........  Does mean that I've had to buy a few more storage boxes to keep it all in!!

Speaking of flowers, there's a new challenge up at Craft All Day (http://craftallday.blogspot.co.uk/) it is to include handmade flowers on a project, obviously that means I can't cheat and use my new goodies but it does mean I can try out making some for myself!  I feel that may be the next post......

Thanks for reading :)